Today we are going to tackle the side zipper opening of the dress. This took me a few experiments to figure it out. I am not even sure if this is the correct way to do it but it works! 🙂 So here goes….
What we did yesterday…
1. Cut out fabric.
2. Preparation work – iron on interfacing for collar lining, serge edges
3. Sew shoulder seams, open seam allowances flat (sewing video)
4. Attaching the collar pieces (sewing video)
5. Finish raw edges of bodice+ collar, armholes, hemlines with bias (sewing video)
How to make (continued)
6.Attaching the zip to the side opening.
7. Sew the inner flap to the back bodice, and the side seam below the zip opening.
8. Sew up the other side seam of the dress.
9. Hand stitch to tuck in top of zip and neaten up side seams.
10. Add decorative frog/chinese knot buttons across the collar and to keep the front bodice attached to the front inner flap in place.
and here’s part 2 of the sewing video. If your connection permits, I highly recommend watching the video in 720HD – the explanatory text is a lot clearer.
For those of you who prefer pictures, I have extracted some screenshots of the key steps for today’s sew-along so you can refer to these if it is easier to view pictures compared to video.

Align side seams where zip is going to be, with fabrics’ right sides together, sew a long basting stitch to temporary hold the back and front bodice together.
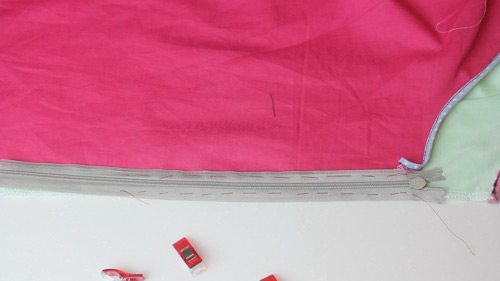
Open up the seam flat, and place the concealed zip (right sides down) onto the opened seam. Align the top of the zip to the bias binding.
Hand baste the zip down on both sides of the seam allowances.
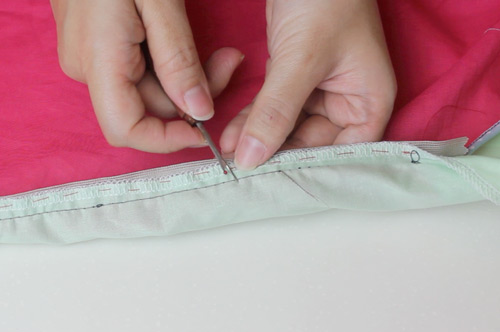
Once the zip is basted, you can remove the first long basting stitch that was holding the front and back pieces together.

Sew the two sides of the zip to the front and back bodice respectively.

Now to sew the inner flap. First, align the inner flap from the armholes, right side facing back bodice. Mark on the wrong side of the inner flap, the position of the zip stop.

Sew with a 1cm allowance, from the top edge down to the point marked blue. Make sure your stitch line lies to the left of the zip teeth so that it hides the top of the zip behind the seam.
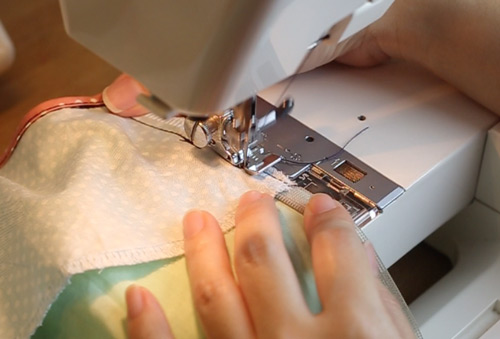
To secure the bottom half of the flap, change to a regular zipper foot, and sew as close to the zip teeth as possible. This time, you have to sew to the right of the zip teeth so the zip is not obstructed.


For the other side, just align from armhole to hem, pin in place and sew with a 1cm seam allowance.

Time to put some finishing touches. first, tuck in the top of the zip by folding it over the bias and then folding back . Hand stitch to keep it in place.
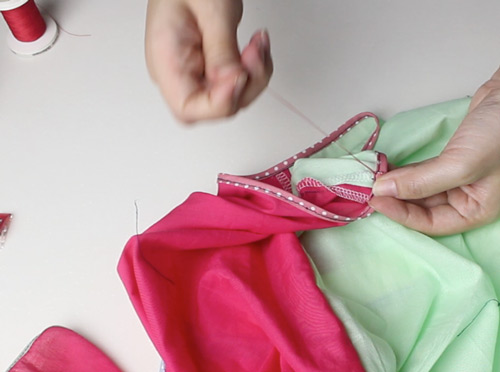
To prevent the side seams from sticking out, open them up and sew them down to the other side of the bias.
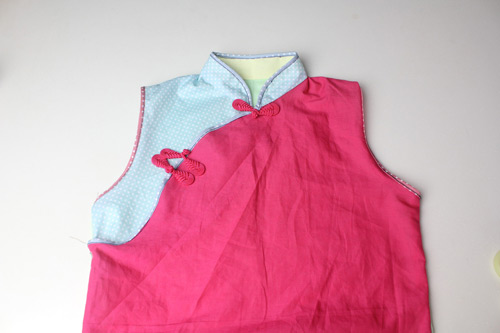
Sew on the decorative buttons, sew on the metal snap fasteners in the gaps between the decorative buttons, and you’re done!
If you made this dress, do post it on my facebook page for all of us to see! I will be sewing two of these in Chinese brocade fabric over the weekend. Will post the pictures up when they are done. Hope you liked my sew-along and keep those suggestions coming for the next one!


Thank you for keeping up your promise & for a great tutorial!
Done! Thanks ! http://diariodenaii.blogspot.com.es/2014/01/girls-qi-pao.html
I just bought the japanese “Sewing Lesson” book with so much different pattern styles in it. I can hardly wait to pick one and get started. I pretty much just sew for my grandgirls so the little amount of boys patterns in it might never get used by me. But you know the feeling when you open a new pattern book……
Happy Sewing
Rebecca from the USA
Thanks again for your pattern and tutorial Yifarn. I’ve almost finished my qi pao – just a press stud to add, and of course getting my daughter to model it…
I don’t do facebook but I’ll let you know when I’ve blogged it.
Blogged! Thanks again Yifarn – my daughter loves her qi pao.
http://thirtynineblog.blogspot.com.au/2014/01/qi-pao-sewalong.html
I just saw your post Marisa, it looks great! I should have specified concealed zip = invisible zip. the Japanese sewing books are fond of calling it concealed fastener. I changed the word fastener to zip thinking it would make more sense but you are right, over here we call it an invisible zipper too so I should have used that 😛
Thanks Yifarn for making such a wonderful and clear tutorial. I have almost completed sewing my daughter’s qipao, still need to sew on the frog buttons before I take the pics and share it with you. I noted that you have another design of the qipao with flare skirt, can you advise how that is made or where I can get instructions on how to do it? Would love to sew a qipao with flare skirt for my girl, it just makes moving around much easier 🙂
I will be posting it up tomorrow, it’s not really a tutorial, just a variation of the original pattern. 🙂
[…] Day 1 ( 14 Jan, Tuesday)- Download PDF patterns, assembly of PDF patterns and Preparation of Materials. Day 2 ( 15 Jan, Wednesday) – Sewing Part 1 Day 3 ( 16 Jan, Thursday) – Sewing Part 2 […]