The following translation request is from Shi-wei who was planning to make this shirt

from this book. Click here to read the full review
Pattern Pieces
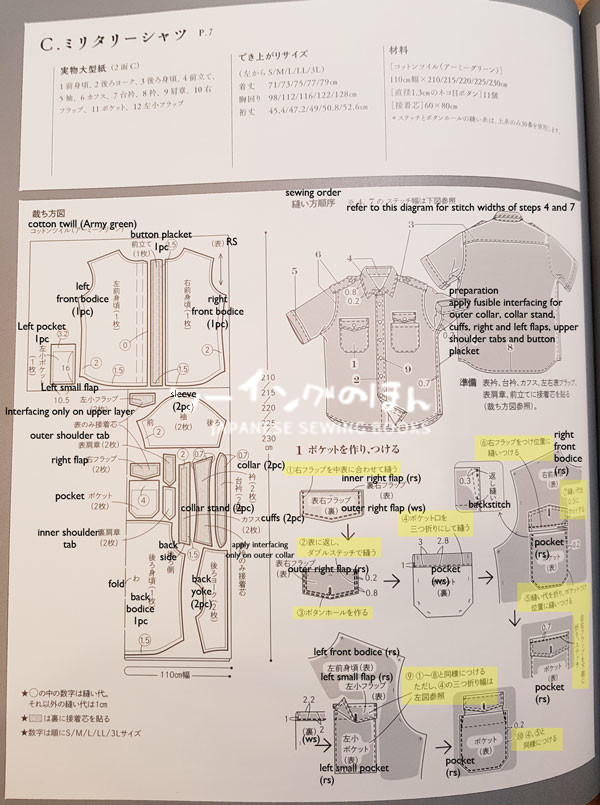
1 Front bodice, 2 Back Yoke, 3 Back Bodice, 4 button placket, 5 sleeve, 6 cuffs, 7 collar stand, 8 collar, 9 shoulder tab 10 right flap 11 pocket, 12 left small flap
finished size
(from left S/M/L/LL/3L)
length
chest circumference
sleeve length (see below for explanation)
The 3rd character in the second column was baffling to me. Thanks to jisho.org, a kanji dictionary that allows me to search by radicals easily, I found the meaning
Noun – 1. distance from the seam in the back of a kimono to the end of the sleeve
together with the word 丈 which means length, so I think it simply means sleeve length, but I’m not sure why this uses the kimono reference and not the usual term for sleeve length which is 袖丈.
Materials
Cotton Twill (Army Green) 110cm wide x 210/215/220/225/230cm
1.3cm diameter cat eye button x 11pcs
Fusible interfacing – 60 x 80cm
Thread for stitching buttonholes – use #30 thread for upper thread
Click on images to zoom in. The parts highlighted in yellow are the actual steps in point form and too wordy to translate, so I’ve written them below. In the above diagram, rs refers to right side of fabric, ws refers to wrong side.
- Make and attach pockets
1.1 Place right flap pieces Right sides together and sew.
1.2 Turn out to the right side and double stitch
1.3 Make button hole
1.4 Finish the opening of the pocket with a double fold hem.
1.5 Fold in seam allowance, and sew the pocket following the marked position
1.6 Position the right flap in the marked position and sew
1.7 Cut the seam allowance to 0.5cm
1.8 Fold the right flap downwards and topstitch
1.9 Follow the same steps from 1.1-1.8, but refer to the small diagram on the left for the width of the double fold hem to fold down.
1.10 Same as steps 4 and 5 - Sew front edge (refer to page 70 step 2)
- Make back bodice, sew shoulders together
3.1 Place back bodice sandwiched in between the outer and inner yoke pieces, sew together
3.2 Fold yoke piece up and topstitch
3.3 Shoulder shoulder seams ofinnerouter yoke piece to front bodice shoulder (edit to add – the book says to sew inner yoke but the diagram shows outer yoke, it should be outer yoke)
3.4 Fold the seam allowance of inner yoke piece, top stitch over the first seam - Make collar and attach (refer to page 13-14, except that you should refer to the diagram on pg 72 (under order of sewing) for actual topstitch width.
- Make sleeves
5.1 Fold the seam allowance
5.2 Place cuffs on the sleeve and sew together
5.3 Turn the cuffs to the front of the sleeve, topstitch - Make shoulder tabes and attach to sleeves
6.1 Place shoulder tab pieces right sides together and sew
6.2 Turn out to the right side and topstich
6.3 Make button holes
6.4 Sandwich the shoulder tab between the bodice and sleeve, right sides together, and sew.
6.5 Finish the seam allowances of both layers by serging/overlocking/zig-zag stitch
6.6 Topstitch on the right side
6.7 Foldover the shoulder tabs with a 0.5cm kise (I don’t know how to translate this but I found a good pictorial reference for this term キセ here) - Sew under the sleeve and side seam (refer to page 15, but refer to diagram under order of sewing for actual topstitch width)
- Finish hem
- Make button holes, attach buttons
The pattern above is from the following book. You can read the full review here –
Book Review and Flip Through Video – Pattern maker Toshio Kaneko’s Men’s Clothes
Title : Pattern Maker : Toshio Kaneko’s Men’s Clothes
Author : Toshio Kaneko
Publisher : Nihon-Vogue
ISBN : 9784529056397


