Browsing Tag

sew-along

Sew-along Sewing Tutorials

Sew-Along Day 1 – The Granny Bag

May 7, 2012

It’s the first day of our sew-along! Before we begin, I just wanted to go into some details on interfacing and fabric cutting. Those of you who have already made bags and are expert sewers, please bear with me or just skip this section and jump ahead to the pattern! 🙂

Interfacing
Interfacing is something like a thin piece of fabric that is added on to make a fabric more rigid. Certain bags that need more structure require it, and some bag makers insist you have to use it everytime, but in this case, I would say that it depends on your personal preference as well as your choice of fabric.

The first bag I made was using linen for both the exterior as well as the lining, and I did not use interfacing for the bag body because linen has a bit of body to it, not to say that the bag can stand up on its own, but it does not flop around as much compared to two layers of medium weight cotton.

For the bag I am making for the sew-along, I used a thicker exterior fabric (something like twill) but the interior was a quilting cotton which was quite thin. So I added interfacing to it. But because the exterior was thick enough, after adding it on it felt a little too rigid for my liking, so I would say it’s really up to you, if you are using thick fabrics like canvas or twill for at least one of the layers, you can safely omit interfacing. The only time I think you must use is if both layers are made of medium weight fabrics.

Fabric cutting

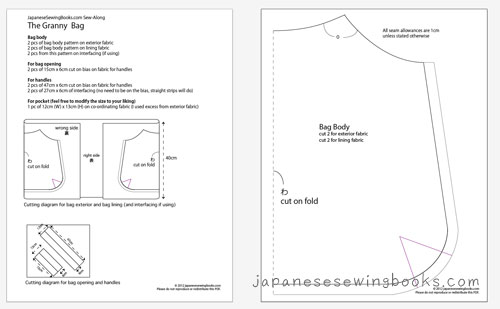
If you are using prints, take note of the the orientation of the graphics and alignment when you are cutting the pieces out. In the cutting diagram I placed the bag body side by side to cut out, in order to save fabric, but if you want a particular graphic to be in the centre of the bag, then just move the pattern piece accordingly. Also, if you are particular about certain elements aligning at the side seams (especially for stripe fabrics or geometric prints), then you may need more precision and maybe more fabric when cutting the front and back pieces just to ensure the sides match up well.

Ok! Let’s start shall we?


1. Download the PDF pattern below and print it out.

2. Cut out the bag body template and lay it on the fold of the fabric. After cutting one out, fold cloth over again and cut the second piece.

3. Repeat for lining fabric, and interfacing if you are using.

4. Cut  out pocket from exterior or lining (or other co-ordinating fabric). The size of the pocket is up to you. The dimensions I have included are to fit an iphone. But if you wish to make a larger pocket, just adjust the size accordingly, but add 2cm to the width (for 1cm seam allowance on both sides) and 3cm to the height (2cm for the top and 1cm below)

5. Here are the pieces you should have – 2 pcs each of exterior and lining, 1 pocket.

6. Following the cutting diagram, cut 2 short pieces of handle fabric 15cm x 6 cm on the bias (meaning diagonally) that will be used to cover the top curved opening of the bag.

7. Cut 2 longer strips 47cm x 6cm each for the handles.

8. Cut 2 strips of interfacing (no need to be on the bias) 27cm x 6cm. (In the diagram the interfacing is placed on top of the long strips, right in the middle)

9. Taking the first bag body piece, line up the pattern on the right side of the bag and mark the darts on the fabric.

Repeat for the left side and then make the same marks on the other piece.

10. If you are not using interfacing, move on and make the same marks on the lining fabric. If you are using interfacing, iron on the interfacing to the wrong side of the fabric first, then make the marks on the interfacing.

11. Remember to put a piece of fabric (not too thick) in between the iron and the interfacing or it will melt and warp and even get stuck on your iron. Guess how I fount that out ? 😉

12. At this point you should have all your bag body pieces ready, marked and ready for sewing.

13. Now we have to prepare the pocket piece. First we need to fold over and sew down the top edge twice (to hide away the raw edges). The “sewing 0.2cm from the edge” is what the books like to tell us to do, but in real life, I just go as neat and near the edge as I can manage  🙂 I don’t really measure or or obsess about it.

14. Now turn it around and do this. You can just crease it with your finger instead of ironing.

15. On the right side of the lining fabric pin the pocket where you want to place it. The diagram shows the measurements I used, you can follow it or adjust it to your liking.

16. Now sew on the pocket. Note the top two corners should be reinforced by sewing a triangle in the corner. This will strengthen the corners and prevent your pocket from tearing out easily.

17. If you want to sew on any other labels or embroidery to any part of the bag, be it exterior or interior, this is the time to do that! I added a handmade label on the other lining piece. For my first bag I added a label onto the front. Get all the labels on because we are going to get ready to sew the bag together.

But, that will be for day 2! See you tomorrow 🙂

Questions? Comments? Spot any errors? Let me know!

Sew-along Sewing Tutorials

My First Sewalong!

May 3, 2012

One of the great suggestions from the Mother’s Day Book Giveaway was to have a sew-along. Originally, I wanted to do a sew-along that will use pattern from a Japanese sewing book so that we can go through the entire process of deciphering the instructions together . However, it will be hard to decide which book or which pattern to make since we may not all have the same books. So I thought about making a bag, as they are usually constructed of simple shapes. But I felt a simple rectangular looking bag will not be “fancy” enough for a sew-along 🙂 Then I wondered, what if the pattern was too difficult, and too complicated to photograph and show the individual steps? I better start with something simple for my first sew-along. Ok I think too much… So instead of thinking, I looked into my bag making bible… I love this book because there are many different basic bags+variations demonstrated with step by step photographs. I need to do a review on this book soon.

And decided on this…

In the book, it’s called a granny bag. But I think it can look quite girly and pretty with the right fabrics.

The original pattern in the book was too big to fit onto a single sheet of paper, and I didn’t want to just copy the pattern as it would be infringing on the copyright. So how do I provide a copy of the pattern to everyone? I constructed my own pattern, using a vector drawing program, and made it out of simple arcs and lines. The design concept is the same, but the size is smaller (so that it can be downloaded and printed on A4/letter size paper) and the shape is slightly different because I just estimated the arc lengths and positions. It took some additional time because the measurements for the straps and cloth are different from the one in the book and I had to test the pattern out first. The completed bag will have a inner pocket and be just the right size for carrying your little things. You can scale this up to make a larger bag, or longer handles so that you can shoulder-carry it.

My first prototype!

The lining and the inner pocket.


It’s a really fast and easy bag to make, great for beginners. The more advanced sewers will find it a breeze. But whether you are a beginner or advanced sewer, the bag is cute and you want it! The finished size by the way, is about 28cm (W) x 24cm (H) x 7cm (D). It’s a perfect everyday bag for your wallet, keys, a paperback (or kindle), a foldable umbrella even.

I will be breaking down the sew-along into three different days. The project can be done pretty quickly but I hope to be able to go into more details which may be helpful for those making bags for the first time.

In the meantime, get your fabrics ready! For bags, it is better to use thicker fabrics. But bear in mind that at certain points (where bag straps overlap) your machine may have to deal with going through 10 layers of fabric. The fabrics I used for the above were Japanese linen. Which hold up pretty well even though I did not use interfacing. Cotton duck/canvas/twill are great for the exterior as they are thicker and have more body, but medium weight cottons are fine too. I would recommend using interface for medium weight fabrics as the bag may end up too floppy.

Don’t use thick fabrics for all layers to prevent too much bulky sewing – i.e. don’t use the same thick fabric for interior+exterior+handles. Use a combination of thick for exterior and medium weight cotton for inside, but stay away from fabrics that are too thin for the inner lining as it may break easily with wear and tear.

I will list down the materials now so that you can prepare them over the weekend.

1. Exterior bag fabric  – 40cm x 80cm
2. Interior bag lining fabric – 40cm x 80cm
3. Fabric for bias (used across opening as well as handles) 50cm x 60cm.
4. Pocket – 12cm x 13cm* (You can choose either to use the exterior or interior bag fabric, or even another fabric. It’s entirely up to you!)
5. Interfacing (for bag body if using normal weight cotton) – 40cm x 80cm
6. Interfacing for handles (27cm x 12cm)

*Note : For the pocket size, it is also entirely up to you how you large you want the pocket to be. I made this to fit my iphone as I hate having to throw my iphone in with my keys and wallet. But it might be too small for you. As this only requires a small piece of fabric, I suggest that you cut out the main bag fabric first, and decide how big you want your pocket to be before cutting it out. Just add 1cm seam allowance to the right, left and bottom, and 2cm on the top.

In case you are wondering, 1 inch = 2.54cm. I did think about doing everything in inches but I figured, we should stick to the Japanese convention because we are going to move on to  more complex sew-alongs (hopefully!) following a Japanese sewing book, which has everything in cm, and it will be a nightmare to try to convert every single dimension to inches, so we should get used to it! Nevertheless, if you need help converting all those figures, just let me know in the comments below and I’ll list them out for you as well.

I have so much more to say about the fabric choices but I will let you digest this first and go into further details during the sew along when we actually cut out the fabrics on Monday! If you have a large piece of fabric to play with, don’t cut it just yet! There are certain things to look out for when cutting fabrics for a bag. Will do that together during the sew-along. If you are using leftover fabric scraps, then just make sure you have enough as this is the minimum amount required.

If you haven’t seen it yet I have started a flickr group as well http://www.flickr.com/groups/japanesesewingbooks/  so I would love to see everyone’s sew-along on it. You can post links to your blog there too so that we can all share our progress as we sew-along.

To sign up, just leave a comment below if you are going to sew-along! Happy Sewing! 🙂

Grab the buttons below and post them on your blog if you have one! Spread the word! The more the merrier 🙂 Let me know if you need help putting it up on your blog as well.

Japanesesewingbooks.com sew-along


Giveaways

Winner of Mother’s Day Book Giveaway

April 26, 2012

First of all, I would like to thank everyone who participated in the giveaway. The winner of the first book giveaway is Sumi! Sumi, I will be contacting you via email soon 🙂 For those of you who didn’t win, there will be more giveaways throughout the year so remember to check the site often.

I will now try to answer some of your questions.

Sew along /Tutorial
Yes I do think a sew along will be up next. The big question is, should I do an adult pattern or kid’s pattern? Should I use one of the free patterns or use one from a book? If I use one from a book will it be useful to those who do not have the same book? I am thinking that I should stick to a book since the detailed process of deciphering the Japanese sewing pattern is the whole point of this website, but will it help you if you don’t have the exact same book/pattern? What do you think?

Flickr  account
I just started a Flickr group called Japanese sewing books and have been trying to take photos of the books that I have as well as the completed projects. You can see some of the photos on the sidebar. Some of the dresses have already been grown out of, or forgotten 😉 So I have to dig through and identify the book/pattern it came from. It’s a public group, so feel free to add on your own book collection or completed projects there.

My own completed projects
I have another blog called Cotton Candy where I post all of my completed work for my kids. But it includes other projects made from other books/patterns/tutorials and sometimes just out of my head 😉 I do try to post pictures of the projects together with the book reviews, they are included in some of the blog posts. 🙂

Book suggestions
Sewing books for older girls – There are books for older kids, except that I have not started buying them yet because my oldest is still <130cm. But I will definitely be exploring it soon.

Sewing books for boys – If I come across any, I will definitely post links to them, one of the magazines I buy frequently is the Cucito magazine which is published quarterly and includes patterns for both boys and girls as well. The graphics are very clear and there are some step by step photographs for certain techniques. I think it’s due for a review soon!

Sewing books for winter coat patterns – There are some winter coat patterns in magazines like Cotton Friend or Cucito as these are published based on the four seasons. So if you get the Winter edition there will be padded coats for winter. There are also books that teach you how to make coats and jackets but may not be waterproof or thick enough for winter. So it depends on how cold winter is for you, and if you have to deal with snow, you may have to make certain modifications. For example, using a standard pants pattern from a Japanese book, I actually made my own snow pants with ripstop nylon exterior and fleece interior, and the kids played in the snow for hours wearing that.

 I’ll be looking forward to hearing your suggestions for a sew-along! As soon as we decide on a pattern, we can get started! 🙂