Browsing Tag

naniIRO fabric

Japanese Fabrics Translations and Help with Patterns

Translation Request – nani IRO Baby Shoes

July 22, 2014

Laura wrote to me end of June, asking me to translate this pattern for her, so that she could sew this for her best friend’s son. He is about 7 months old, and I hope these shoes will fit him since there is no size indication on the pattern.

The original pattern is free and can be found here on nani IRO’s website under the 2008 collection of patterns.

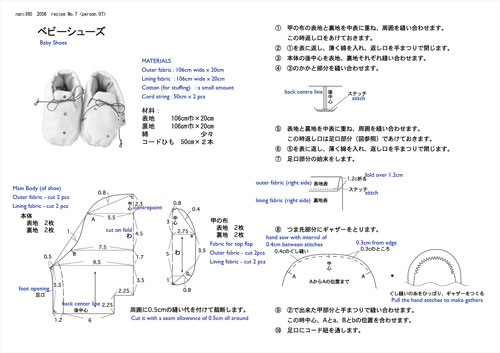
Laura, or anyone who is interested in making this shoe, you may need to check the length of his feet before cutting out the fabric. There is no indication of the completed size but if you look at the centre line where you cut on fold, you can see that the length of the sole is 12cm. You may have to size up or down depending on the actual size of the baby’s foot.

The other recommendation I would make (based on my experience with babies losing their shoes :P) is that this pattern looks comfortable but may drop off easily because there is no elastic around the foot opening. I would suggest sewing in an elastic band around the foot opening at step 7 (Not too tight of course!) which can help keeping the shoe in place.

babyshoes_sm

1. Flap outer fabric and lining fabric for flap pieces right sides facing, sew all around except opening for turning out.

2. Turn the piece sewn in step 1 inside out, insert cotton stuffing. Hand sew opening shut with a whip stitch.

3. For the main body piece, sew along the back centre line (right sides facing). Do the same for each body pieces, i.e. the outer fabric and the lining fabric.

4. Sew the heel portion from step 3 together (see diagram)

5. Place the outer fabric and lining fabric pieces togehter, right sides facing, sew all around, leaving the opening for turning out at the foot opening (see diagram)

6.  Turn the piece sewn in in step 5 inside out, insert cotton stuffing, hand sew the opening shut with a whip stitch

7. Finish the foot opening edge (see diagram)

8. Make gathers for the Toe part of the shoe.

9. Using the piece made in step 2, place it on the main body piece and align the points – centrepoint, A to a, B to b, hand sew together with a whip stitch.

10. Sew on the cord string on near the foot opening.

This looks like a easy and fun project for anyone with babies to sew for! In fact, I have two nieces and one nephew arriving soon so I may have to make a couple of pairs myself! Thanks Laura for discovering this cute pattern!

Japanese Fabrics

Japanese Fabrics – nani IRO 2014

March 28, 2014

It’s been a while since I’ve blogged about fabrics, maybe it’s because I haven’t been buying much lately. This might change soon after checking out the nani IRO 2014 collection! It’s been out for a while now, but I’ve never had time to look at it carefully. Here are the designs for this year and my favourite picks from each of them.

PIERRE POCHO

pierrepocho

The POCHO series is the quintessential nani IRO fabric. My first purchase was a Pocho in turquoise and red water color spots in 2007?  That was the first time I discovered nani IRO . It just caught my eye in the fabric shop and I spent quite some time at the rack deciding which color to buy. 😛

The signature irregular watercolor spots that comes in varying color combinations, sizes and layout every season. Available in double gauze (the 4 colors on the left)  as well as Cotton hemp canvas (the 2 bolts on the right), and even quilted versions for 3 of the colors  (1st, 2nd and 4th from the left) but unfortunately already sold out on the official online store.

This has got to be my favorite color combi. I love pastel and this would be gorgeous on a bedspread!

pocho_quilt

MOUNTAIN VIEWS

mountainviews

The Mountain Views fabric series features strokes (in watercolor) put together to look like a mountain scene. What’s fascinating about this piece is that you can’t really see the big picture from the close up shot. But here’s a picture of the finished sample (below). Gorgeous and rather unexpected use of colors but with mind-blowing results. Available in 5 colors for double gauze and 1 color for laminate (this color only)

mountainviewsbag

WATER WINDOW

waterwindow

nani IRO fabric IS Art. You can hang it up on the wall, especially if you can’t bear to cut the fabric up. Available in Cotton gauze and cottom hemp canvas (only the first bolt on the right) If you asked me to pick out my favorite color out of the 5 bolts, I would have picked the 2nd and 4th. Probably last on the list would be green. Until I saw this….

waterwindowgreen

Isn’t it mesmerizing? Now i think this might be my favorite color combination. I don’t know if the colors look more muted in real life though since I have not seen it in real life yet, but from what I see on my screen it is just a beautiful work of Art. I can’t stop staring at it. I would even consider buying it to hang up on the walls if not for the fact that greens and yellows are not part of my decor palette.

JOY FLOWER

joyflower_love

A very very sweet range of fabrics, and I like all the colors. Only available in double gauze so I am thinking new dresses for the girls? It’s always easier to justify shopping for the kids, although the pleasure of shopping is all mine 😛

joyflower_respect

I love this black fabric too with white contrast prints. Something for me?

SEN RITSU

senritsu_rondo

The Sen Ritsu line is another very sweet fabric which features beautiful watercolor wildflowers.  Available in both double gauze and cotton canvas.

senritsu

CORSAGE KOSA-JYU

corsage_blue

The Corsage Kosa-Jyu series is also about flowers, but this design is only available in dual layered knits. I have some knit fabric from nani IRO’s past collections. The dual layered knit fabric simply means that it is made up of two thin knit layers, very soft and airy and perfect for Spring and Summer!

corsage

FREEDOM GERDEN

freedomgerden

nani IRO fabrics are wearable art pieces. Sometimes the hardest decision to make is which section of the fabric design to cut, since different sections will give you very different results. I love this photo of the baby wearing a Water Window (in green) and carrying a little rucksack made out of Freedom Gerden fabric.

freedomgerdenbaby


SHINE MANY WAYS

shinemanyways_cottonsateen

Shine Many Ways features diamond shapes composed of  “pixels” painted in watercolor.  There is an ethnic feel to the design, and for the first time, the fabrics are available in Cotton Sateen (above two colors only). There are two other colors in the same print but in double gauze material.

shinemanywayssample

Also updated on the website, free patterns using the 2014 textile range.  Go check it out!

freepatternsAll images from naniIRO official website. Visit the online store to see the entire collection. Past years collection are mostly not on sale any more but can be viewed from the Textile museum page. There is also a Basic range as well as other ready made goods for sale on the store. Unfortunately they don’t ship internationally but you can use a forwarding service if you want.


Have you bought any of the nani IRO 2014 collection? Share with us if you have them on your blog, post your links in the comments below!


Back to School Sewing Patterns Free Patterns Sew-along Sewing Tutorials Sewing Videos

Simple wallet sewing video tutorial with free pattern – Sew-along Day #1

February 17, 2014

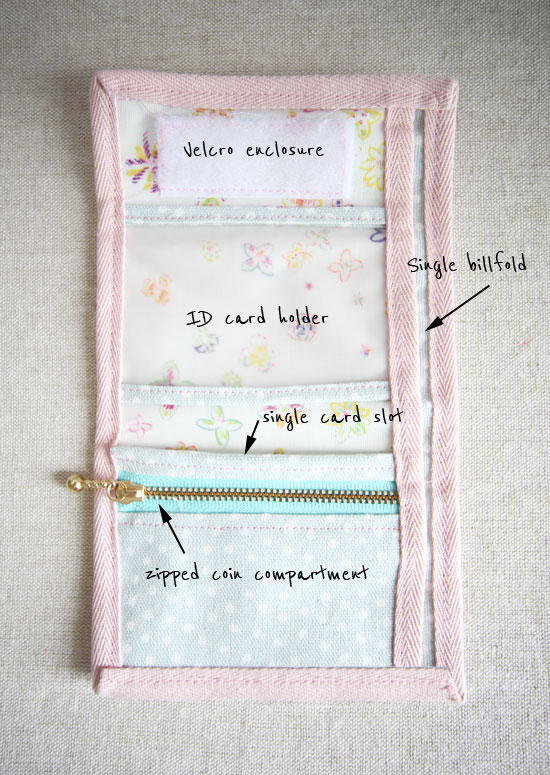
This month’s sew-along, or rather, sewing tutorial, is a simple wallet that I made for my girl to carry to school. As she is only in primary school, she only needs to carry some loose change, a couple of bills occasionally, as well as a single student ID card.  So this is a very simple, minimalistic wallet, which I thought will be great for traveling as well.  There is one zipped coin compartment, one ID card holder, as well as an additional card slot (behind the coin compartment). Both card slots are sized to fit a standard credit card size, but in actual fact there’s enough room for a few cards in both slots.

wallet

I am using naniIRO’s Field STAR Hooray_やっほー  laminated cotton. Isn’t it lovely? I bought it last June during my trip to the nani IRO atelier. I wasn’t looking for laminates in particular but there it was, standing against the wall in the corner, calling out my name ;P  I have been keeping it aside to make a bag of my own, but since it was so precious I was always afraid of sewing with it and possibly ruining it! This is a small little project which only requires a little bit of fabric so I mustered up the courage to cut! and I’m so glad I did. 🙂

walletdiagram

It is really a very simple wallet and quick to sew, so there will only be two posts on this sew-along. Today is all about the materials, and I will post the pattern, or rather, the layout diagram, sewing video and how-to-make on Wednesday. This is so that you can have some time to get your materials ready. Please read my notes below with regards to the materials. Making a wallet usually requires interfacing but due to my choices of fabric I did not have to use any. So do prepare some medium/heavy weight interfacing to give your wallet some structure if you are using light/medium weight fabrics.

Materials

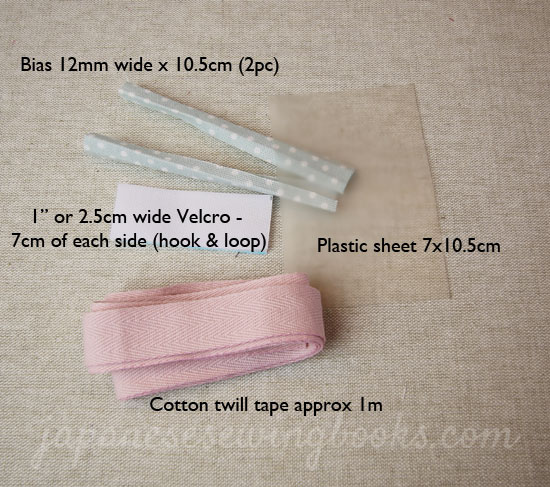
materials_1

materials_2

materials_3

About the materials

Outer fabric
I am using laminated cotton fabric, which is great because it can stand up to dirt and stains. It is also quite stiff and sturdy thanks to the laminated layer. If you are using normal cotton fabric, you can use normal fabric reinforced with medium-heavy weight fusible interfacing. There are also iron on vinyls like those from Heat ‘n’ Bond if you have a favorite print you want to use that does not come in laminate options.

Billfold lining
I used an upholstery weight fabric (for cushions and curtains) for this, so I didn’t need to add interfacing. If your fabric is light weight or medium weight it will be a good idea to reinforce this layer with interfacing.

Plastic Sheet
The plastic sheet was actually salvaged from the plastic cover of an old diary. It is slightly frosted which is great because I find that glossy plastic tends to be sticky and sometimes printed cards will get stuck and leave marks on the plastic piece as well. Look around you for something you can recycle, like an old clear plastic file or old book covers. You can even use vinyl sheets (available in some fabric stores), although I must say that cards tend to stick to vinyl.

Cotton Twill Tape
These tapes come in both polyester and cotton options. Both are fine, but try to get one that is not so thick. I found mine a little too thick for my machine to handle, especially around the folds and overlapping bits, I had to manually maneuver my stitches over the thick areas.

Zip
In the list of materials I mentioned a 12cm zip. I chose a metal zip that was slightly longer because the metal zip stoppers on both ends would have made it difficult for me to sew the twill tape over. So I chose to use a slightly longer zip and cut off the excess.

Ok, time to go shopping for your materials! If you have them ready, move on to the next post for the tutorial – Simple wallet sewing video tutorial with free pattern –  Sew-along Day #2


Buying Guide Japanese Fabrics

Directions to nani IRO Atelier

July 11, 2013

While the memory is still fresh in my mind, I thought it would be useful to jot down the directions to the nani IRO Atelier in Osaka. Some of you who might be heading to Osaka for a holiday might find it useful if you are going fabric shopping. It is definitely worth a visit if you are a big fan, because not only do they have the latest fabrics, there are also fabrics archived from the past seaons. There are limited prints and mostly pre-cut fabrics. There are also ready made Zakka goods (SUMAU nani IRO range) available for sale. In any case, if you are a fan, you will love it!

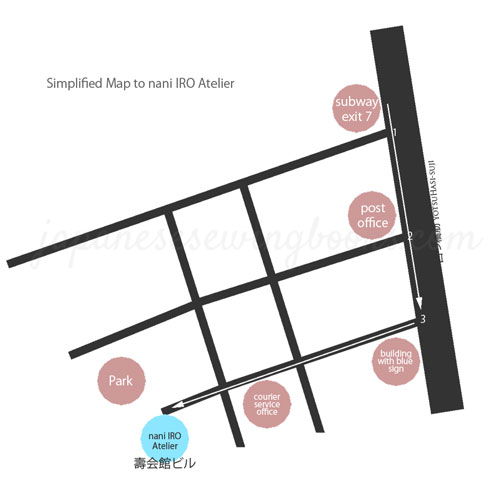
Before I left, I saved a copy of the map from their official site on my phone, but I still got lost. I think the main reason is because there were too many lines and road names and not many landmarks on the map itself. So I decided to create my own (at the bottom of the page) where you only need to know the major road to follow, and the landmarks to guide you along the way.

First of all, take the subway to the 肥後橋 (Higobashi) station. Here I am taking it from Namba station.


Click on image to view larger picture (picture from Google Maps street view)

Once you get to the station, follow the directions in the station, and look for Exit 7. You will emerge from the underground subway station via this stairs, landing right outside this shop called Aoki Men’s Plaza (see the blue sign in the picture above?) which sells Menswear. Walk in the direction of the green arrow in the picture. You will cross junction #1 after the green arrow.

Click on image to view larger picture (picture from Google Maps street view)

At the next block, you will see a Japan Post Office (Orange sign). Keep walking along the main road in the direction shown above. Walk past the Japan Post Office and you will cross junction #2 (see the crossing in the picture?)


Click on image to view larger picture (picture from Google Maps street view)

Just before the next junction (#3), you will see this brown building with a blue signboard. The name of the building is way up on the top, so I didn’t see it at first. And the alley didn’t look quite right, as there were no visible shops from the main road. But this is the right turning, so turn into the alley and walk straight ahead.


Click on image to view larger picture (picture from Google Maps street view)

You will pass by a open air public carpark on the left. Keep walking down the alley.


Click on image to view larger picture (picture from Google Maps street view)

At the next block you should see a courier service office (with the blue sign) on the left. This is were I asked for directions because I just wasn’t sure I was on the right track. But it is the right way, so keep walking. You will need to cross another junction after this block with the courier office.

Click on image to view larger picture (picture from Google Maps street view)

After crossing the junction, you should see quite a large neighbourhood park on the right. On the left there is a row of low buildings.

The white one! The name of the building is 壽会館ビル – which you see in gold words. Atelier to nani IRO is on the second floor. See the flag hanging from the window? I almost missed it because there were some trucks parked in the building before it. Anyway, enter the building and you will see a steep flight of stairs on the left. Take the stairs to get to the second floor. and there you are!

No photos allowed in the store, so this was the first photo I snapped on my mobile after shopping. It’s a big bag. And they wrapped it in plastic carefully because it was raining.

Back in the hotel, admiring my purchases, wishing I bought more 🙂

Carefully wrapped presents for two very lucky friends.

Click on image to view larger picture

Here is the simplified map. One thing to note, the instructions on the official site said to get out at Exit 8, but Exit 7 is actually nearer.

Photo credits : Many of the street view photos are taken from Google Maps and I added further directions. It was raining cats and dogs on the day I went, so it was impossible to take any photos with my DSLR and hold an umbrella and find my way at the same time. The street view feature on Google Maps is quite amazing. you can try it for yourself and see.


View Larger Map

Giveaways

Winners of nani IRO giveaway

March 29, 2013

Thank you all for your entries, likes and shares!

There were more than 100 entries so it did take some time to compile the list and pick a winner. Here’s how I picked the winner. First, I listed down the names according to the comments, then I gave multiple entries based on the number of items marked off on the list. After doing that, there were 307 entries to pick from. In an Excel spreadsheet, I jumbled all the names up in random order and then used a Random Number Generator to select two numbers, and these were the numbers picked.

The two lucky ladies are Debra Lee and Jamie! I will be contacting you both shortly via email to get your mailing address so that you can receive your prizes.

Debra will win the first fabric on the left (Nani Iro Woodblock POCHO Japanese Fabric – Geology – brown and cream) and Jamie will receive the fabric on the right (Pon Pocho – NIKO)
Congratulations to you both and hope you have a great time sewing with the fabrics.

Thank you once again to Frances from Miss Matatabi on Etsy for sponsoring the fabrics. 🙂

Have a good weekend!