Browsing Category

Guides

Guides

Browse Japanese Craft Books online

April 16, 2012

Today’s link is not for a free pattern, but an amazing discovery. It’s not a new thing but I had no idea it existed till last week! It’s a really useful website for me because firstly, it is from my favourite Japanese sewing books publisher Nihon Vogue. Secondly, it allows me to browse through the pictures in the book! In our local Kinokuniya, there is an online purchase option with free delivery above $50. Which is pretty handy if I know what books I want to get. But I will have to go down to the bookstore if I wanted to look through it first. However, in the bookstore, the books are always wrapped up to prevent people from browsing. So if I wanted to look through a book to see what designs are included, I will have to lug the entire stack to the counter and ask them to unwrap them for me.

So why do I say Nihon Vogue is my favourite publisher?

Just a view of the shelf right above my sewing space. These are the books that contain patterns that I’m working on at the moment, or the ones I refer to or use the most. The ones with the yellow labels are from Nihon Vogue.

Here is a screenshot of the website. (note on the upper right hand corner there is a link to English. There are some books available for browsing on the English version but it’s only a small selection compared to the Japanese version.

In the top picture, under each of the book thumbnails, there are two buttons. The one with orange text brings you to a flash actionbrowser which allows you to browse through the book. The button below with pink text brings you to the book details page with the publication dates, author, ISBN, etc.

In the bottom picture, I did a close up of the search box on the right. You can only enter keywords in the box. ISBN search doesn’t work here. So if you have the ISBN number, click on the link below and it will bring you to an advanced search form where you can key it in.

At the bottom of the home page, you can browse through new publications, books sorted by genres (I’ve translated the text incase the icons are not clear), as well as periodicals. Look! My favourite Pochee magazine is there!

So when you click on the individual book details, this is what you get. This goes to an online shopping bookstore. You can browse by hitting the orange button (on some pages it is grey) to launch the browser from this page.

And a new window opens with a flash browser. You navigate it either with the tool bar below or just click on the pages to flip back and forth. The quality is not fantastic because I think they restrict the page zoom feature to prevent people from copying the pictures. But you can clearly browse through the pages. Note that the how-to-make sections and patterns are not available for browsing, only the finished projects are available. Which is fair because they just want you to see the pretty clothes and buy the books 🙂 This is a great help and makes shopping so much easier! What I will do now is to browse through these books, note down the ISBN number and order them from Kinokuniya. Even if the books are not listed, I can email them to request them to order from Japan without extra charges.

For other books not by Nihon Vogue, you can search for them under www.amazon.co.jp. There are many books that include quite a fair number of pages for browsing. I might compile a list based on the books I have to recommend and link them up from another post.

Happy browsing!


Guides Translations and Help with Patterns

Fabric names translated from Japanese

March 28, 2012

I come across many comments while surfing for Japanese Sewing Books, that Japanese patterns are very pretty, the photos in the books are gorgeous, but the results always look shapeless and sometimes pajama like?

Not true. First of all, there are books with properly fitted bodices/dresses that are not loose and airy. It’s just that they seem to like this style alot (both adults and kids) so we see them very often. Secondly, when choosing a book, you may get carried away by the pictures, but you also have to look pass the beautiful pictures and actually think about the end product. Envision on you or your child and think if its a style that suits you. If you can’t carry off cap sleeves, or A-line skirts, then don’t buy it just because it’s pretty! It is pretty much like online shopping. You can’t try it on so you have to imagine. Sometimes the best patterns are made in prints you don’t like. But don’t dismiss it yet! With a plain solid fabric or just a change in print, it could become your favourite dress!

So the reason for this post is that I believe fabric choices are very important when it comes to constructing a garment. More so for Japanese patterns. The wrong weight of fabric, or even a different type of fabric can give it a different drape and not do justice to the pattern. So I try to make the garment in the recommended fabric and once I’ve made one, I can tell if I can use a different material as a substitute. Most Japanese Sewing books do include this information, so I hope this list will be helpful to you!

レース lace
ローン lawn
リネン linen
ガーゼ   gauze
ダブルガーゼ double gauze
シャンブレー chambray
ボイル voile
クレープ crepe
シルク silk
シャンタン shantung
サテン satin
タフタ tafetta
ブロード broadcloth
ギンガム gingham
ギンガムチェック gingham check
ソフトデニム soft denim
シーティング sheeting
チノクロス  chino cloth
コーデュロイcorduroy
フラノ flannel
厚手デニム thick denim
帆布 canvas
持ち手テープ acrylic tape for bag handles
カツラギ  katsuragi (something like twill which is thick cotton but lighter than denim)
ワッフル waffle
スウェッド suede
ジャカード jacquard
チュール tulle

Combination of words
Obviously the list is not exhaustive, but these are the more common ones I’ve come across in my books. There are also instances when they add the word 綿 in front of the fabric. The word 綿 simply means cotton. So if  you see 綿ローン it means cotton lawn.

Sometimes you will see the words 無地 in front of a fabric name, this simply means that this is a solid color with no print or pattern. When you see the words プリント this means “Print” which in turns means that the fabric is printed or has a pattern.

For example,
無地サテン Solid color satin (i.e. no prints or patterns)
プリントサテン Printed Satin (i.e. with patterns)

If you come across any other words that you need to translate, you can drop me an email with a snapshot of the word, I’ll try my best!

Last updated 25th April 2015

Guides Translations and Help with Patterns

Understanding the instructions – working example

January 27, 2012

It’s been a quiet week on the blog, because we are celebrating Chinese New Year over here in Singapore. Only two days of public holidays but many people have taken leave because there is so much partying to do. 🙂 Will be back in full force next week.

In the meantime, one of my friends needed help translating a pattern. She borrowed a book which doesn’t provide step by step photographs, but do not be afraid of buying these books, especially if you really like the patterns in it. I’m going to show you how to understand the instructions, simply by using key words from the dictionary of sewing terms

The pattern is from this book called Girly style wardrobe.

The instructions included the material list as well as the list of steps on how to make, seems like not quite enough information when you are just given the following.

So I asked her to look for the words 作り方 (How to make) which is always usually under the 材料 (Materials) list.

Note that the instructions usually consist of nouns and verbs. If you can make sense of these, everything is easy peasy 🙂

So the english translation for this pattern is

  1. Sew shoulder seams
  2. Sew side seams
  3. Make frill (for sleeve) and attach
  4. Cover raw edges of armhole with bias fabric
  5. Sew side seams of skirt
  6. Sew bodice and skirt together
  7. Sew the back middle portion, attach the fastener (zip)
  8. Cover collar with bias fabric
  9. Make the frill for the hem and attach.
  10. Attach the loops for the belt cord
  11. Attach hook and eye loop for back of dress
  12. Make cord and pull through loops.

* For instructions on covering armhole, refer to pg. 50 (garment “h”),
For attachment of fastener (zip) pg 80 (garment “s),
For attachment of cord loops, refer to pg 56 (garment “k”)


Guides Translations and Help with Patterns

Understanding a typical Japanese sewing pattern

January 17, 2012

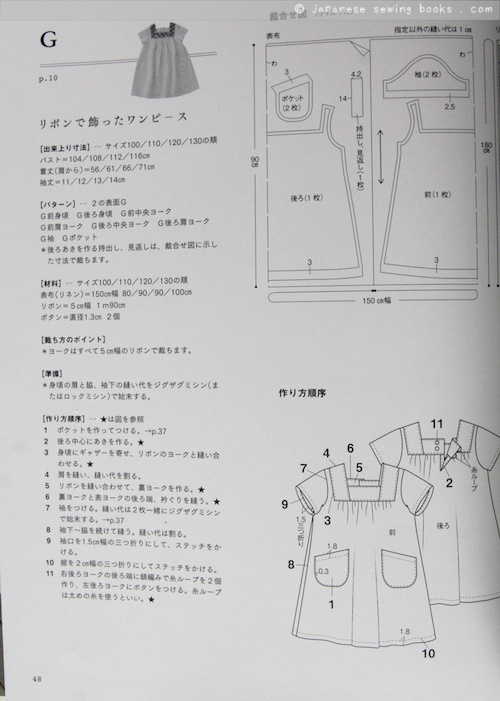
After posting the dictionary of sewing terms, I shall now go through an example of a typical pattern you can find in the sewing books. Most pattern books follow a similar structure such as this one.

You will usually find something like the above, with the size information as well as the list of materials and procedure, as well as two diagrams. One for cutting of the fabrics and one for the procedure. Let’s break it down into 4 parts to get a clearer picture.

First, determine the size you need. Then locate then pattern (G in this case) and prepare the materials.

Special notes to take care of when cutting, preparation details, and then order of making. (refer to diagram below)

For most books, unless specified, the seam allowance is usually 1cm. The seam allowances are usually denoted by a number and a line/arrow to the seam.

Hope this will help! I didn’t translate most of the section of “order of making” since it is specific to this garment and will not make much sense to another project, but understanding what the individual sections are about and the diagram conventions, as well as referring to the dictionary of terms, it should help you get started.

Just leave a comment if you have any questions.

Guides Translations and Help with Patterns

How to make – Choose size, locate instructions and trace the patterns

January 14, 2012

This will be a series of posts to guide you through the steps of making a dress using a Japanese sewing book pattern. Hope that this will be useful especially to beginners or those of you who have just bought one for the first time and can’t wait to try!

Step 1 – Find the size chart, and choose the appropriate size. You can always just choose based on the height (身長)but sometimes it is not accurate, and also because some dresses are meant to be loose or tight fitting, so it’s always better to follow the bust/waist/hip measurements.

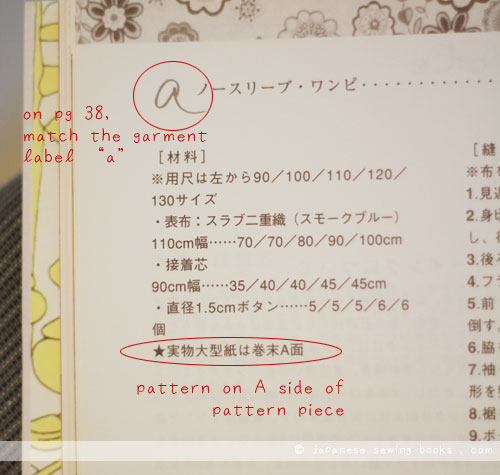
Step 2 – Look for the pictures of the garment you with to make. In this book it is labelled with lowercase alphabets. In this example we will use the garment “a”. Under the description, you will find the page number of the instructions.

Step 3 – Going to page 38, check the garment name “a”, and find where the patterns are located. In some books there are more than one pattern piece. In this book, there is one piece attached with two sides “A” and “B”. The instructions above tells us that this garment’s pattern is located on the A面 which simply means side A.


Step 4 – Before you go to the pattern piece, have a look at the cutting layout on the same page as the instructions. You will need this diagram to know how many pattern pieces you will need to trace. You will need this diagram again later on to layout the pieces on fabric for cutting.

Step 5, detach pattern piece from book carefully, look for side A.

Step 6 – Look for the lines marked for garment “a”. Each piece is marked with the garment part as well.

Step 7 – start tracing! Note that some books with similar designs may have different set of lines (for slight differences like bodice length/skirt length) So always follow the ones marked with the garment name. in this case, do not stray away from “a”! 🙂

Step 8 – Last step, label and mark pattern piece before cutting out.

Step 9 – check layout diagram again to make sure you have all the pieces you need.

Next week, I will move on to cutting of the fabric, where we will cover tracing the patterns onto the fabric, and marking seam allowances.