Browsing Category

Girls Sewing Patterns

Free Patterns Girls Sewing Patterns Sew-along Sewing Tutorials Sewing Videos

Girls Qi Pao (Chinese Dress) Sew Along Day 3

January 16, 2014

Today we are going to tackle the side zipper opening of the dress. This took me a few experiments to figure it out. I am not even sure if this is the correct way to do it but it works! 🙂 So here goes….

What we did yesterday…
1. Cut out fabric.
2. Preparation work – iron on interfacing for collar lining, serge edges
3. Sew shoulder seams, open seam allowances flat (sewing video)
4. Attaching the collar pieces (sewing video)
5. Finish raw edges of bodice+ collar, armholes, hemlines with bias (sewing video)

How to make (continued)
6.Attaching the zip to the side opening.
7. Sew the inner flap to the back bodice, and the side seam below the zip opening.
8. Sew up the other side seam of the dress.
9. Hand stitch to tuck in top of zip and neaten up side seams.
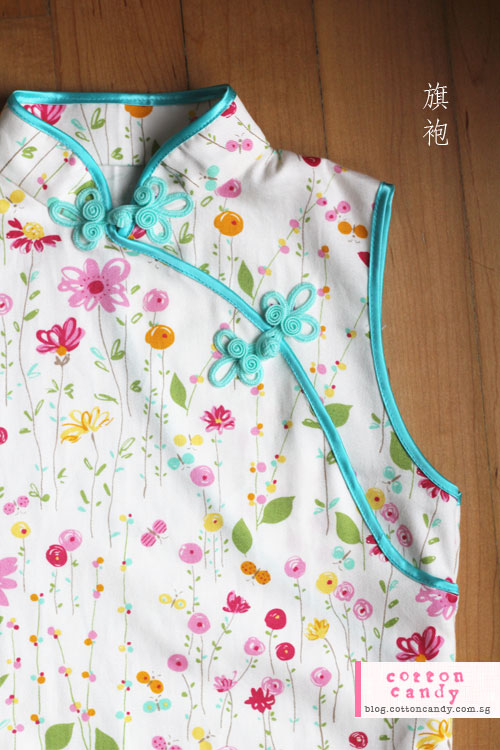
10. Add decorative frog/chinese knot buttons across the collar and to keep the front bodice attached to the front inner flap in place.


and here’s part 2 of the sewing video. If your connection permits, I highly recommend watching the video in 720HD – the explanatory text is a lot clearer.


For those of you who prefer pictures, I have extracted some screenshots of the key steps for today’s sew-along  so you can refer to these if it is easier to view pictures compared to video.

day3_1_alignside

Align side seams where zip is going to be, with fabrics’ right sides together, sew a long basting stitch to temporary hold the back and front bodice together.
day3_2_bastezip

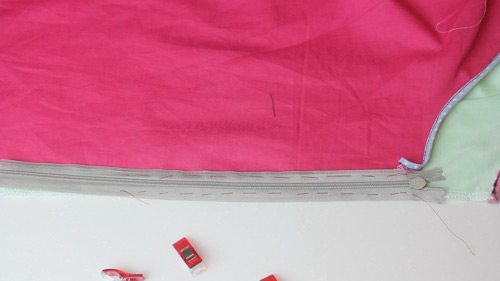
Open up the seam flat, and place the concealed zip (right sides down) onto the opened seam. Align the top of the zip to the bias binding.
Hand baste the zip down on both sides of the seam allowances.
day3_3_unbaste

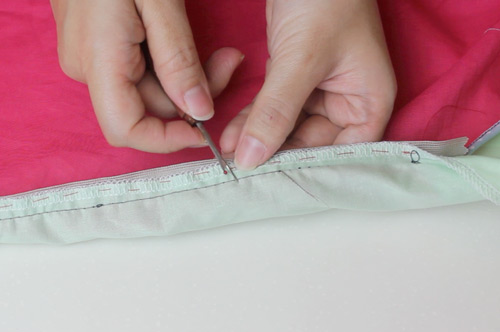
Once the zip is basted, you can remove the first long basting stitch that was holding the front and back pieces together.

day3_sewzip

Sew the two sides of the zip to the front and back bodice respectively.

day3_5_markzipstop

Now to sew the inner flap. First, align the inner flap from the armholes, right side facing back bodice. Mark on the wrong side of the inner flap, the position of the zip stop.

day3_6_sewtobluemark

Sew with a 1cm allowance, from the top edge down to the point marked blue. Make sure your stitch line lies to the left of the zip teeth so that it hides the top of the zip behind the seam.
day3_7_sewbelowbluemark

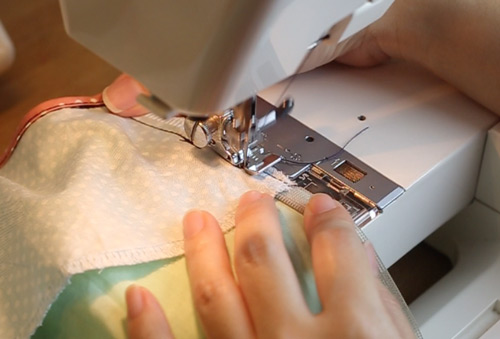
To secure the bottom half of the flap, change to a regular zipper foot, and sew as close to the zip teeth as possible. This time, you have to sew to the right of the zip teeth so the zip is not obstructed.

day3_8_zipdetails

day3_9_alignotherside

For the other side, just align from armhole to hem, pin in place and sew with a 1cm seam allowance.

day3_10_topofziptuck

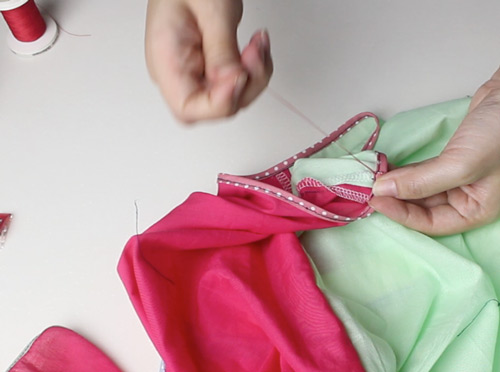
Time to put some finishing touches. first, tuck in the top of the zip by folding it over the bias and then folding back . Hand stitch to keep it in place.
day3_11_sideseams

To prevent the side seams from sticking out, open them up and sew them down to the other side of the bias.
final_500

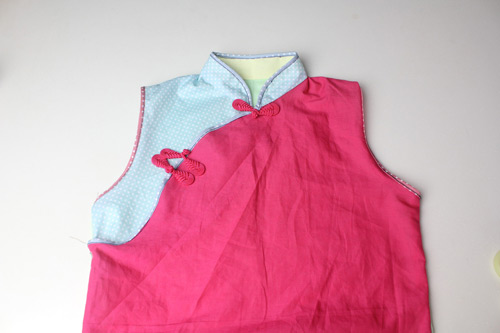
Sew on the decorative buttons, sew on the metal snap fasteners in the gaps  between the decorative buttons, and you’re done!

If you made this dress, do post it on my facebook page for all of us to see! I will be sewing two of these in Chinese brocade fabric over the weekend. Will post the pictures up when they are done. Hope you liked my sew-along and keep those suggestions coming for the next one!

Free Patterns Girls Sewing Patterns Sew-along Sewing Tutorials Sewing Videos

Girls Qi Pao (Chinese Dress) Sew Along Day 2

January 16, 2014

Now, let’s get started! This is what we are going to be doing today. The sewing was mainly documented in video form and I did not have enough time to take screenshots so most of the sewing process will be in the form of a video tutorial.

How to make
1. Cut out fabric.
2. Preparation work – iron on interfacing for collar lining, serge edges
3. Sew shoulder seams, open seam allowances flat (sewing video)
4. Attaching the collar pieces (sewing video)
5. Finish raw edges of bodice+ collar, armholes, hemlines with bias (sewing video)


1. Cut out pieces on fabric
As mentioned yesterday, it will be a good idea to make the first piece in a cheap fabric, just to test for fit and make any adjustments.

Following the directions on each pattern piece, layout the patterns on your fabric, and transfer the outlines using chalk/fabric markers.

These are the pieces you should have after cutting out the fabric. I have used different color fabrics for all the pieces in this tutorial, so that while I am taking close up pictures, you can still identify the individual parts of the dress without getting confused.

pattern_collars
pattern_front

pattern_back

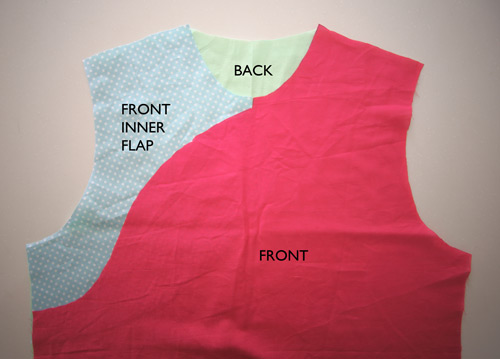
Do take note for the orientation of the two front pieces. If you cut the front piece by placing the pattern piece on the wrong side of the fabric, the curved edge will be on the left side of the dress. (from front centre down to left side seam). If you do that, make sure you do the same for the front inner flap, i.e. to trace and cut out on the wrong side of the fabric, and you will get two pieces that match each other.

If you wish the curve to be on the right side of the dress (running from centre front to right side seam), then mark on the right side of the fabric. Do the same for the front inner flap.  This was how I cut my fabric. I placed my pattern pieces on the right side of the fabric and this is the orientation of my pieces (right side up)

patternorientation

You are seeing it on the monitor and hence it is a mirror image. Imagine if you turn the dress around and put it on, and you will see that the front curve runs from the centre front down to the right side seam.

2. Preparation work

– apply fusible interfacing on collar lining piece.

pattern_collars_interfacing

– serge shoulder seam and side seams (see diagram below for edges to serge

prep_sergediagram


For steps 3-5, please watch the video below. As mentioned earlier, I did not have time to extract the screenshots for a step by step photographs tutorial. So I hope it’s not a problem viewing on youtube for most of you. I do find video tutorials more useful and less words are needed for explaining the process, so I hope you will enjoy them too.

Tomorrow we will finish up with the side zip opening, side seams, and the decorative buttons down the main bodice curved opening. Before we move on to that, it will be a good idea to test the fit on your little girl (if it’s not meant to be a surprise :P). You can make some adjustments to the armholes/waist/length if you prefer the dress to be more fitting. I will leave it to your discretion.

See you back here tomorrow for Day 3 of the sew along!

Girls Sewing Patterns Sew-along Sewing Tutorials Sewing Videos

Girls Qi Pao (Chinese Dress) Sew Along Day 1

January 14, 2014

Welcome to Sew Along Day 1 of the Girls Qi Pao (Chinese Dress). Today we will download and assemble the pattern and get our materials ready.

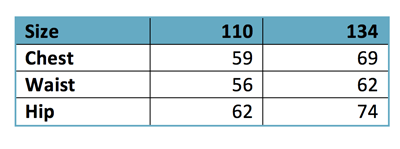
1. First, please choose your size and download the corresponding PDF file. 

sizechart_rev

Please download from my PDF pattern shop – PorcupinePatterns.com. both sizes are included in a single file.

If you need other sizes, there is a paid version available for sizes 2-12 on my store as well. The paid version has both A-line and Straight styles, with sleeveless, short sleeve and cap sleeve options. Click here for to view the details.

2. Print the patterns on A4 paper, remember to set your paper size on your printer settings to A4.

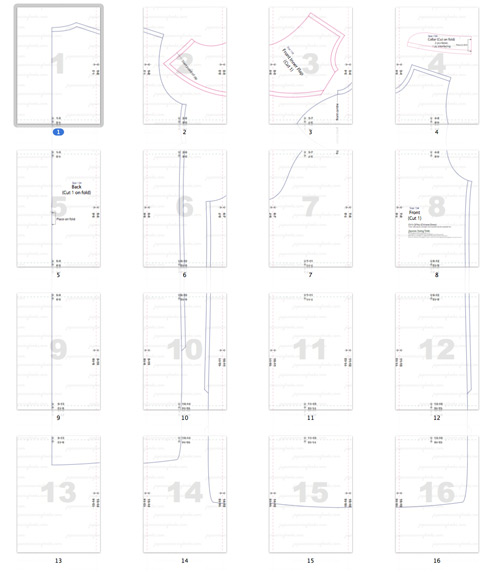
3. Layout the printed pieces based on the layout diagrams below. 

Size 110
Assembly layout as below (click on image to zoom in)

110LAYOUT_500


Size 134
Assembly layout as below (click on image to zoom in)

134LAYOUT_500

4. Align the printed sheets
Match corresponding page numbers and align the arrows so that the vertical and horizontal dotted lines meet up (see diagram below)

howtoassemblePDF

5. Tape or glue the pieces together.
What I usually do is to cut along the pink dotted line on the left piece (page 6 in the example above), apply glue to the left of the pink dotted line on right piece (page 7 in example above), and stick page 6 over page 7, aligning the arrows and dotted lines.  But it is up to you how you want to assemble the pieces.  If you need more help with this let me know.

6. Cut out the pattern pieces
All the pattern pieces already include seam allowances, so once you have assembled the PDF pattern, cut out the pattern pieces.
You should have the following pieces.
1 x Front
1 x Back
1 x Front inner flap
1 x Collar

patternpieces

Now that we have all the pattern pieces, let’s get our materials ready

Materials
(in order of sizes 110 /134)

1. Outer Fabric (based on 90cm wide fabric – 1.3m  / 1.5m
I will be using brocade for the actual dress, which is 90cm wide, so these quantities are based on a 90cm wide fabric
optional – If you want to make the collar lining in a contrasting fabric, you just need a piece of 35cm x 10cm piece of co-ordinating fabric

2. Fusible Interfacing  35 x 10cm

3. Bias tape – can be ready made or self-made.
I am using single fold bias tape in my tutorial which is 12mm (approx.  1/2″) wide – 2.7m/3.2m
If you are making your own using co-ordinating fabric, cut the fabric cross grain 24mm or 1″ wide. The final width of the binding will be 6mm or 1/4″ respectively.

4. Frog buttons / Chinese knot buttons
You should be able to get these easily online or hopefully even in your local sewing stores. If not you can always make your own! There are a variety of different knot buttons, some are really simple to make and there are couple of tutorials online that you can follow to make your own.

5. Sew on metal snap buttons 7mm – 3 sets 

6. Concealed Zip – 20cm(8″) / 25cm(10″)

Getting the patterns ready was tedious work! If you spot any mistakes, be sure to let me know. 🙂

Tomorrow, we will start sewing!

Click here for Sew-Along Day 2

Free Patterns Girls Sewing Patterns Sew-along Sewing Tutorials Sewing Videos

Girls Qi Pao (Chinese Dress) Free Pattern and Sew Along

January 13, 2014

Welcome to the first sew-along of the new year! The first sew-along will not be from my Japanese sewing books collection, but a long overdue project that I’ve been meaning to do for my other blog Cotton Candy. The Girls’ Qi Pao (pronounced ch’i-p’ao), also known as the Cheongsam or the Chinese Dress.

I made this particular dress last year as part of racial harmony day celebrations in school, and posted it on my Cotton Candy blog. It was requested by a number of readers who wanted to make this for their girls. I got the patterns drafted but never had time to get around to actually making it again. Then someone reminded recently that Chinese New Year was approaching so I better hurry up! I’ve just finished putting the patterns together, and now I just need to sew, take photographs (and take a video if I can) of the steps, which I will do so over the next few days as part of the sew-along.

Terms of use : All of the patterns I created are free for personal use only, that means, you can’t use it or modify it to make products for sale. If you want to share the source of the pattern, please credit and link it directly to my website. Thank you for respecting my work!

Read this first!!!

I have to emphasize that I have never actually learned how to make the Qi pao in the traditional tailor’s way. So what I’ve done here may not be the most “correct” way of sewing it. My attachment of the collar is definitely not textbook, but I like to do it this way because I don’t get extra stitch lines at the base of the collar lining, nor is there a need to hand stitch (you will know what I mean when we get to sewing the collar.)

– The patterns I have drafted are based on the sizes in (Metric Pattern Cutting for Children’s Wear and Babywear). I will attach the size chart in the post tomorrow for your reference. The sizing is based on height and average proportions as provided in the book. The ages for the corresponding heights given in the book are approximated based on average data, so when deciding which size to make, it will be better to take measurements of your child rather than following the height dimension alone.

– Also know that this is a midi dress dress (ends middle of calves) and also quite fitting. It is not tight-fitting like the original ladies version, as I have added some ease for the comfort of children but neither is it meant to be baggy or shapeless. As for the length, you can adjust it as you see fit.

– Because the textbook proportions may not be perfect for everyone, I suggest you make a muslin / test piece out of cheap fabric first to test for fit and make adjustments, especially if you are going to use expensive fabric.

– The younger children may not like the fitting collar, so you can want to modify the collar a little or move the decorative buttons lower down (lying on the bodice instead of the collar as shown in my photo) so that it is not too restrictive.

– I will be making the dress in Chinese brocade but you can also make it in silk/cotton, or any other fabric you fancy. Get creative and have fun!

Sew-Along Schedule

Day 1 ( 14 Jan, Tuesday)- Download PDF patterns, assembly of PDF patterns and Preparation of Materials.
Day 2 ( 15 Jan, Wednesday) –   Sewing Part 1
Day 3 ( 16 Jan, Thursday) – Sewing Part 2

Please join me in the sew-along! Or bookmark this page for future sewing reference if you don’t have time to join in now. I will be adding links to the above scheduled posts as we go along, so you can always access all the necessary pages from this main page. That’s all for today. See you tomorrow for the sew-along!

Book Reviews Girls Sewing Patterns Japanese Sewing Books

Book Review – Neat and Lovely Girls’ Dresses 100-160cm

November 11, 2013

I made a last ditch effort to dig around the archives for this book review, I was so sure that I had reviewed it, partly because I remember being really excited about its release and I bought it as soon as it was available (that was some time in May or June). But I could not find any pictures or drafts related to it, so it must have been my imagination. So here it is finally, the book by Yuki Araki – きちんと可愛い女の子服 or Neat and Lovely Girls’ Dresses, for sizes 100-160cm.

There are 21 patterns for sizes 100-140cm and 9 patterns for sizes 150-160cm.

 Patterns were attached to the front of the book this time. 2 large pattern sheets.

 An overview of the garments included in this book. The ones in the image above are for 100-140cm.

The 9 patterns below the divider are for 150-160cm. Out of the 9 patterns for 150-160cm, M, K, N and O are only available in 150,160cm sizes. The rest (marked with a star) are available in 100-160cm sizes.

Let’s have a look at some of the garments.

Frill Cami-Blouse

Dress with large collar.

 Cami-Dress with Leggings (both dress and leggings’ patterns included)

 Blouse with back ribbon tie. So pretty!

 Ribbon tie on the back of the blouse.

 Ribbon pants with the ribbon detail on the back. It took me a while to figure out why this was called ribbon pants 😛

 Deep collar dress (I am literally translating the titles here ;P) It actually means a low neckline with a collar.

Dress with Raglan sleeves (this is the dress on the cover) made with a scalloped border fabric. I can’t seem to find any scalloped edge fabrics here. Do you know of any online sources?

 Ribbon dress with ribbon details on the shoulders. Both the dress and ribbon are made of satin material which explains the nice sheen to it. Lovely isn’t it?

 3-tier blouse + Ribbon skirt. There are two huge ribbon ties on the side of the skirt which you may not be able to see from the picture as it is a white lacy fabric.

Flap Blouse and Below-the-knee pants (literally!) I really like this blouse. It has a very interesting overlap effect on the sleeves, making them look puffy and somehow really stylish and cool! The pattern for the blouse is only for 100-140cm though. The patterns for the pants go up to 160cm.

 2 layer blouse + Frill skirt.

 Modified collar knit (blouse) and Fishing pants?

Jacket + Side box pants (literal translation.The “box” in the title actually refers to the box pleats on the side seams) Very interesting use of pleats.

 Long Cardigan (matching with the adult pattern in last week’s Sewing Pochee review)

Coat. Yup, it’s just listed as コート (Coat) Love the contrast trim details!

 There are 2 sewing lessons with full color photographs. One is for the Side box(pleat) pants and the second is for the Ribbon dress (the one with satin bows on the shoulders)

 A close up of the step by step photographs.

 Size chart (Left coloum – Height / Bust / Waist / Hip)

 The rest of the patterns are included in the back in the usual format. Materials, Cutting layout, Order of make and an overall diagram with the order of steps. Most of the steps other than the obviously simple ones like sewing side seams or shoulder seams, are illustrated in diagrams (see below).

 A close up of the diagrams.

I highly recommend this book, firstly because there are not many sewing books out there that cover this awkward range in-between tween-going-on-teenage years. I can think of a few reasons. Firstly the girls may not want to wear clothes made by Mum anymore, cuz it’s just not cool 🙁 Secondly, they want to choose their own outfits, particularly those that their friends are wearing. You know, those mass market brands 🙁 . But I like how Yuki Araki makes the effort to make the clothes look stylish and unique. In fact some of them look really cool and with the right choice of fabrics, they can look rather designer as well.

Those of you who still have little girls can also get a lot of mileage out of this book since it includes patterns from 100cm (which is suitable for a 3/4 yr old? I forget how tall my daughter was at 3) all the way till 160cm. So it is really a must have in your collection if you have little girls to sew for. You can also check out the other book that I reviewed previously by the same author for the 90-130cm range.

Title : きちん可愛い女の子服 Neat and Lovely Girls’ Dresses
ISBN : 978-4-529-05189-7
Author : 荒木由紀
Publisher :Nihon-vogue

Kichin to kawaii onnanokofuku / Yuki Araki

buy now from cdjapan