Good morning! Today we will start making the balloon dress. Before we begin, I’ll just make a quick explanation about the terms. The balloon dress is basically made up of two dresses. One wide dress on the outside (referred to in the instructions as dress in surface fabric/surface fabric), and one inner dress (referred to as dress in lining fabric/lining). The outer dress in surface fabric is wider and longer, while the inner lining dress is narrower and shorter. So that when the outer dress is gathered to fit the inner dress, it forms a balloon dress.
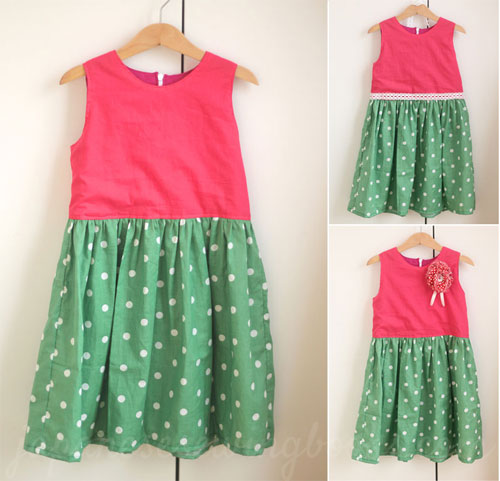
In the book the inner and outer dress are made using the same fabric. It is really up to you if you want to do that. You can opt to use a co-ordinating or even plain lining fabric for the inside. In my example I’m using cotton lawn for both inside and outside. But in two different colors. My surface fabric is magenta, inner fabric is a reddish pink.
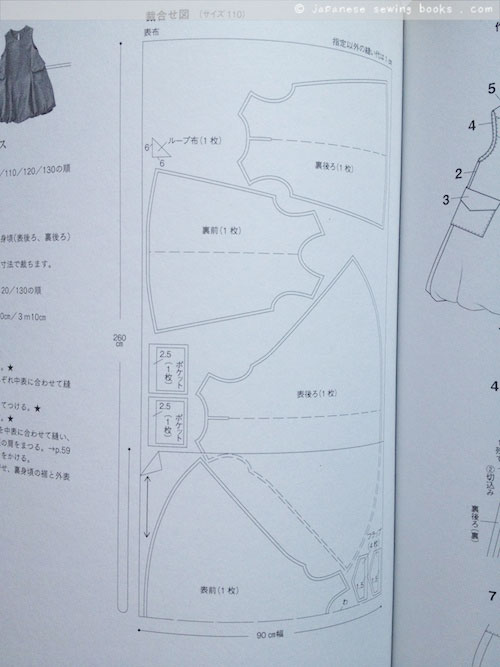
If you have not bought your fabric yet, do take note that because the pattern outer/surface fabric dress is very wide, you will need to cut the fabric cross grain (see diagram below). I was using a standard 110cm width cotton lawn fabric (note that in book it’s a 90cm width), and I was making a 110cm size for my 4 yr old. I tried to save fabric by cutting it straight grain at first, but the sides were not wide enough. So it is necessary to take into consideration the print orientation if you have not bought your fabric or have not cut it yet.
Ok let’s start!
STEP 1
This was the method for making the loop according to the book. The loop in the end, consists of only 2 layers of fabric, with two raw edges. My first dress was made using double gauze and it frayed easily, so I could not use this method. So it depends on the type of fabric you are using. If it’s thin enough you may want to do a double fold to tuck in the raw edges completely. I leave it up to you.
Warning before the next step : This loop will be sewn on to the back in the next step. The instructions required trimming down the length to 3.5cm but the loop was a little too short to handle while sewing. It involves alot of sticking your finger very close to the needle to keep it in place. If you find it hard to handle, you can choose NOT to trim the edges down to 3.5cm. Just mark the length on the piece, and use the markings to align to the center line. In that way, you will be able to have more grip on the loop while sewing it down, and then trim off the excess later on. So read on first before deciding whether or not to cut it off, but I will follow the sequence in the book instructions anyway.
Alternatively, you can choose to do a different finishing instead of the hook+button combo in the book. I made one dress with two long cords (for a ribbon tie), and you can also use a short elastic band. Another way to get around the difficulty of sewing on the short loop (if you have cut it already) will be to tack it down by hand. Later on it will be secured with proper stitches while attaching the surface and lining pieces together.
Trim off ends leaving 3.5cm
Next, sew it to the back bodice (right side).
I’m showing you the final result first so you know where to place the loop for sewing. 1cm from the top edge, align ends of loop to centre line.
This is how I sewed the loop. First lay it flat (with raw edges facing towards you). Align edge to centre line, and sew down 0.3cm from center line.
Then, using your fingers or tweezers, lift the presser foot (with needle down) and turn the loop in. Lower the presser foot carefully as the loop may try to slip out and continue sewing the bottom of the loop.
STEP 2 :
表身頃、裏身頃の脇をそれぞれ中表に合わせて縫い,縫い代を割る。
Translation : For surface body piece, inner body pieces, sew down the side seams with right sides together, and press seams open.
(No diagrams included in the book)
First, do the lining pieces. With front and back pieces, place right sides facing, and sew down the sides.
Oops, label is crooked. Had to unpick and re-do it 🙁
ETA : Great news! This book is now available in English and the title is called Linen, Wool, Cotton Kids
Buy now from Amazon (affiliate link)
Links to the sew-along
Go to introduction of Balloon Dress Sew-Along
Go to Day 2 of Balloon Dress Sew-Along
Go to Day 3 of Balloon Dress Sew-Along


11 Comments
This is such a nice sew along, I might try it, if I can finish up some projects I have almost done there. But I have always want to make this dress, I made the bubble dress from Oliver + S and loved it sooo much, now I want to try this one so bad, thanks for your help once again!!!! Can not wait to see how yours turns out!
Hi Patty, you can always do the Sew-along later, the instructions will always be online. The dress is done and my 4 yr old loves it 🙂
Thank you so much for the tutorial, I’m going to try sewing the balloon dress for my granddaughter!
So excited when I found your site and even more excited at finding this dress! Then I realised it was for children 🙁 How hard would it be for a novice to make this grown up sized? How do you think I could go about it? Many thanks for a wonderful site!
Hi Carla, if you have a basic A-line dress pattern (with an easy fit) in your size you should be able to modify it to fit you. Basically the inner lining skirt will be your A-line dress pattern (but shorter), and for the outer dress patter, trace off the bodice up to somewhere between the underarms and waistline, then flare it out and extend it longer than the inner dress skirt. The amount to extend depends on how long you want the final skirt to be plus the folded up section. Gather the bottom hem of the outer skirt and fit it to the hem of the narrower A-line dress. Since the outer dress is longer and wider than the inner dress, it will fold up inwards and create the bubble effect. Gosh I hope that makes sense! ;P If you look at the pictures of the original inner and outer dresses (kid version) you should be able to see what I mean.
Thanks so much for this tutorial! I checked the Japanese version of this book out of the library and will use your tutorial to make it. Quick question: How can you tell if seam allowances are included in the pattern? Are they included in the main pieces of the bubble dress?
Thanks!
Hi, the seam allowances are not included in the pattern, you will have to follow the cutting layout diagram under the how-to-make page to add the correct seam allowances after tracing out the patterns.
I was wondering which fabric(s) you would recommend to make this dress. Should one use a slightly stiffer fabric. like linen, chambray or taffeta, to give the ballon more heft?
Thanks very much!
Hi Frances,
If you want to achieve the same look as the book, all they used was a simple cotton. I made two of these. One with a light cotton lawn, and one with a double gauze. Both dresses puff up nicely, so the dress itself is quite voluminous. I am thinking that a thick fabric will end up very bulky at the seams because of all the gathering. Bear in mind too, that this dress is two layers. A larger outer layer gathered to match the hem of a shorter inner lining, which means it may get quite hot if you use it with a thick fabric.
I think taffeta will be cute for a special occasion dress though, it will stay nice and puffy. 🙂
Love your site and the tutorial.I will definitely try it for my 4 year old daughter.
[…] Go to Day 1 of Balloon Dress Sew-Along Go to Day 2 of Balloon Dress Sew-Along Go to Day 3 of Balloon Dress Sew-Along […]